Installing the Adobe Connect Meeting Application on Restrictive Client Networks
Note: This article contains a JPEG image. You may need to refresh the WordPress page in your browser to view it.
This article provides information supplemental to the official published tech-notes, installation and user guides. It is not exhaustive and is offered as an additional tool for network administrators attempting to rollout the Adobe Connect Meeting Application (ACMA) on a restrictive client network. This article is intended primarily for on-premise administrators although there is information herein that may be helpful for network administrators who are rolling out the Adobe Connect meeting Application for use with Adobe Connect Hosted and Adobe Connect Managed Services accounts.
A list of other relevant published resources follows:
- The Adobe Connect Meeting Application can be downloaded here in both exe and MSI media: Download Adobe Connect
- The official tech-note for installation including the MSI is here: Install Adobe Connect application for desktop
- A troubleshooting tech-note that may be helpful is here: Troubleshoot issues with Adobe Connect application for desktop
- A basic usage tech-note for end users is here: Adobe Connect application for desktop
Evolving Group Policy Object (GPO) implementation, anti-virus software options, firewall, thin-client, diverse rollout mechanisms and security appliance restrictions may affect the installation of the Adobe Connect Meeting Application (ACMA) particularly on closed or restrictive networks that implement the MSI rollout option.
For example, some users have reported difficulties with the auto-update option used to update the ACMA during active Meeting attendance. In some cases problems with this can be attributed to limited permissions for end users to update the ACMA prior to its being officially pushed out via MSI on a restricted network where understandably it may be difficult for the network team to keep up with the latest available ACMA updates.
In a client audience that includes internal users on a restrictive network along with external users who may be on a less restrictive network, Meeting experience may vary among those varying clients and appear confusing to Adobe Connect Meeting Hosts and Administrators. In some cases where MSI installers are pushed, some users may also have permission to download and install the exe option from the Adobe Connect Downloads URL while inside an active Meeting room while those on a VPN or on clients with a restrictive GPO may or may not.
In cases where restrictions apply, clients may experience the ACMA try to update, fail and not auto-update. In some rare cases clients will be put in a loop where they cannot update and must click the option to cancel the ACMA update to proceed.
When the process of auto-update is unrestricted, the ACMA creates a temporary folder Con***.tmp *on Windows in %AppData%\Local\Temp and downloads the payload<version>.zip file into that temporary folder Con****.tmp. After the installation is done it deletes the Con****.tmp folder.
All the temp files create by the ACMA have the naming convention of Con****.tmp. It creates multiple file in the Windows temporary folder while the ACMA is running. The name of the temporary folder may not be obvious as it is random generated by the Windows OS.
In some cases of a failed installation, it may be prudent to find and clear the contents of the temporary installation folder on the client: AppData\Local\Temp
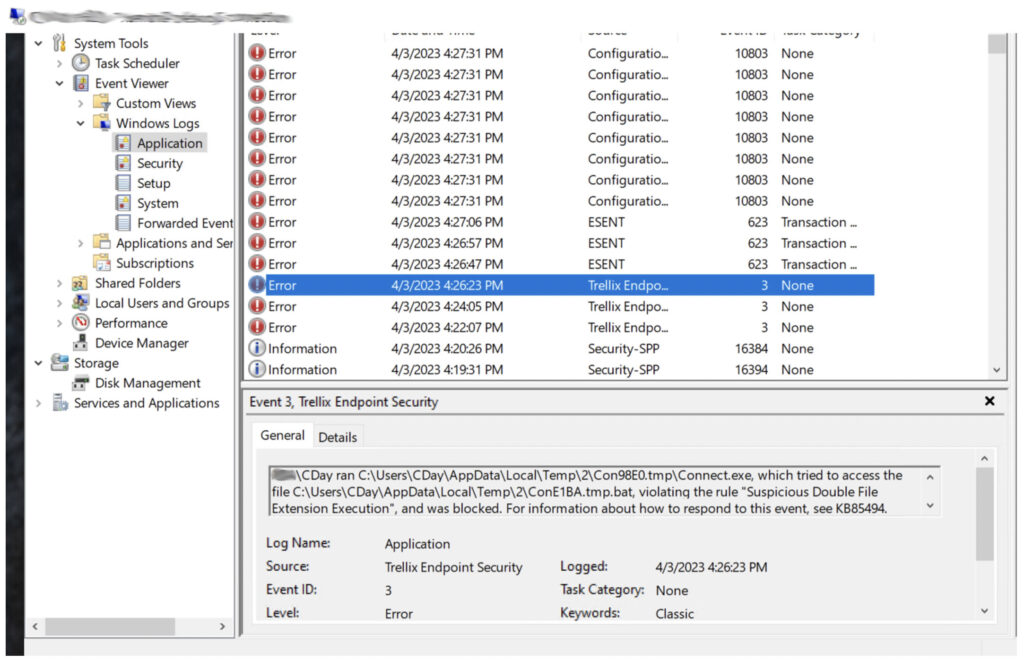
Whenever the ACMA fails to install, there will be helpful information in the Windows Application logs. See in this example where a Trellix Endpoint Security restriction has apparently prevented the update of ACMA:
The first step of the auto-update is to fetch he UpdateDescr.xml file from the server and based on the current version of the ACMA, it shows the update dialog. If this step is working then the user can see the update dialog. The file accessed is the updateDescr.xml You may view it here: https://www.adobe.com/go/UpdateDescr To see if a client can gain access to the auto update option hosted at Adobe, simply check for access to this page to see if this URL and also the payload URL https://www.adobe.com/go/Payload are accessible from the affected client network.
If a user clicks the update button in an active Meeting, it downloads the payload url: https://www.adobe.com/go/Payload and once the download is completed, it extracts to the Windows temporary folder and the installation process begins.
Note: If there is a file named installer.ini file in installation folder, %appdata%\Adobe\Connect, it may contain parameters that will make the ACMA try to download from localhost so it is prudent to inspect the installer.ini file if it is present there.
If the Adobe hosted ‘go’ url is not accessible in a restricted environment, you can specify the specify the updateDesc path or customize the payload path directly in installer.ini:
- updateDescr = http://connect-server-url/common/UpdateDescr.xml
- payloadGoUrl = http://connect-server-url/common/payload.zip
When the MSI is rolled out to clients, it installs for each user when they first log in by calling the setup.exe /msi to install the ACMA under each user appdata folder. However, if the user accounts are restricted from making changes to the system even here in this user profile, this can fail and never fully install.
Note: Currently Adobe Connect does not support installing ACMA at the system level, but you can force the proto launch by enabling acl-field forceConnectProProtoLaunch (a popup will appear in the browser and the user needs to allow that).
The MSI should normally install the application for all the users without any need for custom manual interventions such as copying the files to every user’s AppData folder. After running MSI every user needs to log in at least once and it will be installed for them.