Error creating or editing a UV profile
This article is applicable only to customers using Universal Voice telephony profiles and running into a very specific error in the user interface. If you are not experiencing the exact problem below, you do not need to worry about this article.
Update: 5/23 – We are fixing this issue in our hosted environment as part of the 9.5.3 upgrade which is currently being rolled out across the various clusters over the next month.
For licensed (on premise) customers (this includes customers in the ACMS program and customers hosted by other Connect hosting partners other than Adobe), we will be releasing a patch in early June, 2016 for the Connect 8.x and Connect 9.x environments.
The error: ‘This field only accepts valid DTMF commands and phone numbers (+,0-9,*,#,-,space,A,B,C,D).”
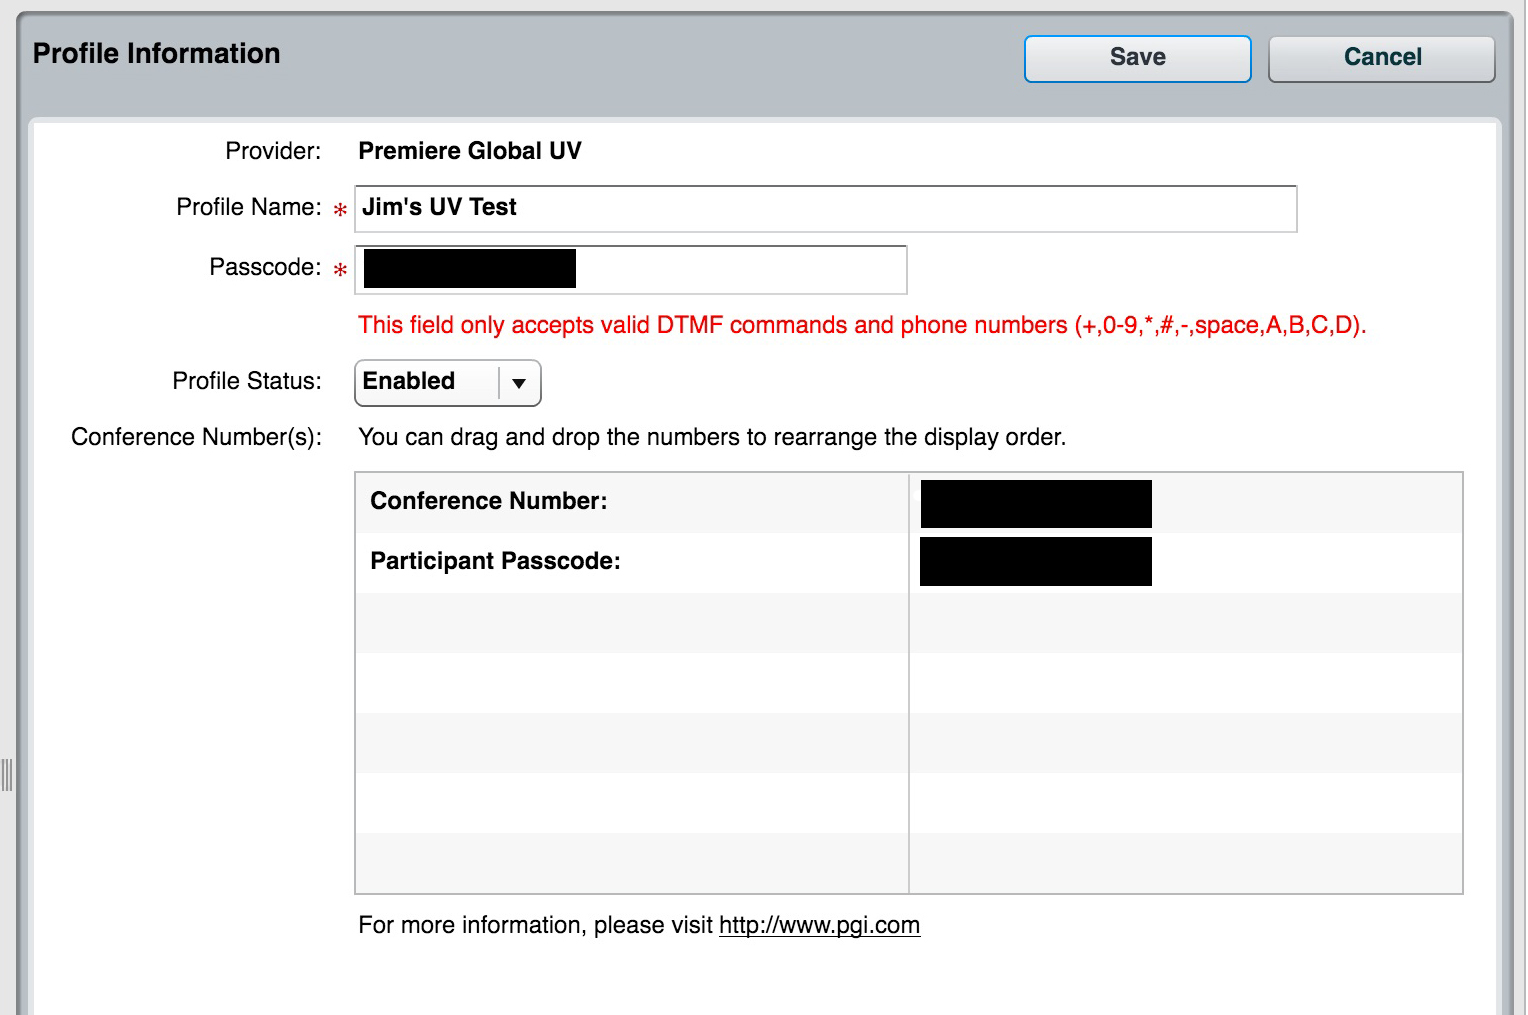
Issue: Recently an issue has cropped up with editing existing (or creating new) Universal Voice (UV) profiles. This is directly related to a required change that was introduced in the latest version of the Adobe Flash Player. The behavior is that if you try to go into My Profile > My Audio Profiles > and click the ‘New Profile’ button or My Profile > My Audio Profiles > and select an existing UV profile and click the ‘Edit‘ button, you will get this error (above) when trying to SAVE the profile.
This issue is resolved in the upcoming Adobe Connect release (9.5.3). In the interim (for Adobe Hosted customers while they wait to be upgraded) or for Licensed (on-premise) customers who may be on an older version of the application and not able to upgrade to 9.5.3 right away when it comes out, there are basically 3 ways around this problem…
- [1] Downgrade Flash player to a version prior to version 21 or use a browser or machine that has an older version of the Flash Player (prior to 21). This would require you to uninstall the Adobe Flash player in a browser where it is not embedded as part of the actual browser, and install an older version from the archived versions here.
- [2] Create (or just edit an existing) mms.cfg file on the system and add the following flag (line) in the file (this will ONLY work for the next 3 months approximately). This is only a temporary solution and the Flash Player team plans to remove support for this flag in upcoming updates but for now, it can be used until we deliver possible patches for older Connect versions and fix this in the upcoming 9.5.3 release.
enablePCRE2=0
This mms.cfg file can be created on your system in a simple text editor if it doesn’t already exist on your computer. First do a search for it. If it doesn’t exist, simply create a new file in Textpad or Notepad or Textedit or whatever you use for a simple text file editor. Add the one line above and save the new or existing mms.cfg file (with that line as either the only line in the file or added to the bottom of whatever else is in that file).
On Windows systems, the mms.cfg file would be (or needs to be) placed in:
C:/Windows/system32/Macromed/Flash (32-bit Windows) and C:/Windows/SysWOW64/Macromed/Flash (64-bit Windows).
On Mac systems, the mms.cfg file would be (or needs to be) placed in:
MainDisk:Library:Application Support:Macromedia
- [3] Use the XML API. As this is only a Flash Player issue and only affects users who are using the UI in Adobe Connect, if you are familiar with the XML API, you can use the ‘telephony-profile-update‘ API as a workaround. If you are not familiar with the XML API, the documentation for the API is here. If this is still confusing for you and you are not quite sure how to execute XML API calls, the steps below will not be for you. If you need clarity on the below, please contact Adobe Connect support as you normally would.
The workflow is as follows for the API (again if you are not familiar with the API, you need to either familiarize yourself with the product documentation, ask and admin for assistance, or use one of the other workflows above to work around this issue):
For existing profile updates:
1) Find the profile-id by making this API call in the browser once you’ve logged into your Adobe Connect account: https://{yourConnectURL}/api/xml?action=telephony-profile-list
It will list out all your profiles. Search for the one you want to edit and make note of the ‘profile-id‘ value (numeric) and the ‘provider-id‘ value (also numeric).
2) Get the field-ids by running this API: https://{yourConnectURL}/api/xml?action=telephony-profile-info&profile-id=xxxxxxxx (where the profile-id = the numeric value of the profile from call 1 above).
This will show you an XML response with telephony-profile-fields listed. You may have a field for a certain moderator pin or other value you need to edit. The field will be listed as an ‘x-tel‘ field. It will be in a format that looks like this: ‘x-tel-123456789‘ or something similar with numbers after the ‘x-tel’.
You can also get the fields for the provider by taking the provider-id and running this API: https://{yourConnectURL}/api/xml?action=telephony-provider-field-list&provider-id=xxxxxxxx
This will show you all the ‘x-tel-xxxxxxx’ values you need to use.
3) To update that field, you would make this API call: https://{yourConnectURL}/api/xml?action=telephony-profile-update&profile-id=xxxxxxxx&provider-id=xxxxxxxx&field-id=x-tel-123456789&value=xxxxxxx&profile-status=enabled (where profile-id, provider-id both equal their corresponding numeric values from the first API call above…and where the field-id= the x-tel value from call 2…. and where value= the new value you need to edit)…
For creating NEW profiles:
1) Find the provider ID you want to create a new UV profile from with this API call: https://{yourConnectURL}/api/xml?action=telephony-provider-list . The provider-id value gets returned in this result.
2) Obtain a list of all the applicable provider fields by running this API call: https://{yourConnectURL}/api/xml?action=telephony-provider-field-list&provider-id=xxxxxxx (where the provider-id = the numeric provider-id for that UV provider).
3) Run this API to create a new UV profile: https://{yourConnectURL}/api/xml?action=telephony-profile-update&provider-id=xxxxxxxx&profile-name=xxxxxxx&field-id=x-tel-xxxxxxxxx&value=xxxxxxx&profile-status=enabled (where the provider-id= the numeric provider-id for that UV provider… field-id= the x-tel field you want to populate …. value = the value (numeric) of that field…. profile-name = the name of your new profile …. profile-status=enabled ).
Of course, you could have more than one field to populate as everyone’s UV providers/profiles could be custom and unique to a requirement.
If you are unsure, you need to talk to your Connect admin or contact Adobe support of course for any questions regarding the above profile creation or update steps. A support agent can assist you with identifying values and creating / updating profiles if needed.