Configuring Secure SQL with Connect
It may be prudent to secure the connection between the Adobe Connect application servers and the SQL database.
Begin with the SQL server and then move onto the Connect server(s); if your SQL server is shared then begin with a change request to the DBA who has charge over the shared SQL environment. If your SQL database is already secure, you may skip Part I.
Part I. Securing the MS SQL Database Server:
First open the Certificates snap-in:
1. Open the MMC console, click Start, and then click Run; In the Run dialog box type: MMC
2. From the File menu, click Add/Remove Snap-in….
3. Click Add, and then click Certificates. Click Add again.
4. You are prompted to open the snap-in for the current user account, the service account or for the computer account. Select the Computer Account.
5. Select Local Computer, and then click Finish.
6. Click Close in the Add Standalone Snap-in dialog box.
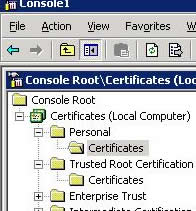
7. Click OK in the Add/Remove Snap-in dialog box. Your installed certificates are located in the Certificates folder in the Personal container.
Use the MMC snap-in to install the certificate on the server:
- Click to select the Personal folder in the left-hand pane.
- Right-click in the right-hand pane, point to All Tasks, and then click Request New Certificate….
- The Certificate Request Wizard dialog box opens. Click Next. Select Certificate type is “computer”.
- In the Friendly Name text box you can type a friendly name for the certificate or leave the text box blank, and then complete the wizard. After the wizard finishes, you will see the certificate in the folder with the fully qualified computer domain name.
You are done now with installation of certificate on the SQL server, next you will need to export the certificate so that the same can be imported in the Connect application server.
- Open MMC, and then locate your certificate in the Personal folder.
- Right-click the certificate name, and then click Open.
- Review the Certification Path tab. Note the top most item.
- Navigate to the Trusted Root Certification Authorities folder, and then locate the Certificate Authority noted in step 3..
- Right-click CA, point to All Tasks, and then click Export.
- Select all the defaults, and then save the exported file to a location where the Connect application server can gain access to it.
Configure SSL encryption in the MS SQL instance:
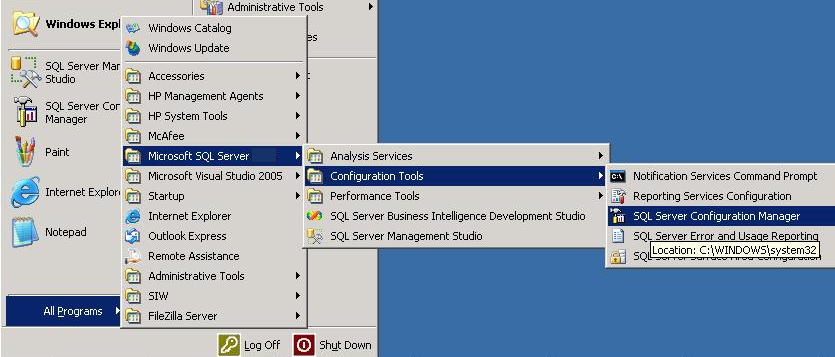
1. On the SQL server start menu open Microsoft SQL Server>Configuration Tools> SQL Server Configuration Manager:
2. Expand SQL Server Network Configuration, then right-click Protocols for MSSQLSERVER, and choose Properties. Select the Flags tab and change the Force Encryption setting to Yes.
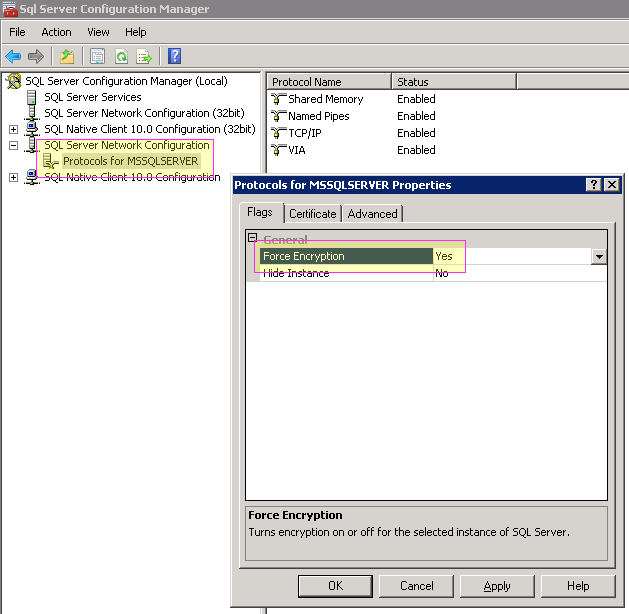
3. Under the Certificate tab, choose the certificate created earlier from the drop down list:
The database is now ready for secure connection with the Connect application server.
Part II. Configure the Connect application server to support a secure SQL connection:
Importing the certificate onto the Connect application server
- Copy the certificate from MS SQL Database server to the Connect application server(s) or to an accessible share.
- Navigate the Connect application sever by using the MMC snap-in, and then browse to the Trusted Root Certification Authorities folder.
- Right-click the Trusted Root Certification Authorities folder, point to All Tasks, and then click Import.
- Browse, and then select the certificate (.cer file) that you copied in step 1. Select the defaults to complete the remaining part of the wizard.
Create a Trust Store
1. Be sure to have java installed on your Connect application server; at the command prompt, navigate to the bin directory of your JRE, and execute the following command:
keytool -import -file <certificate file path> -alias firstCA -keystore <any name for trust store>
Note: This step will queue for a password, create and record a password for future reference.
2. In the ConnectProSvc.conf in the appserv\conf directory, add the following entries in the list of JAVA arguments:
wrapper.java.additional.28=-Djavax.net.ssl.trustStore= <path of Trust Store file created in step 1>
wrapper.java.additional.29=-Djavax.net.ssl.trustStorePassword=<password you created in step 1>
Configure the secure connection in Connect:
1. In custom.ini file under the root Connect installation directory, add the following entries:
DB_ENCRYPTION_METHOD=SSL
DB_VALIDATE_SERVER_CERTIFICATE=true
2. Cycle the services or reboot the server:
Adobe Connect Service
Flash Media Service
Note: For secure LDAP or LDAPS with Connect and for additional granularity around the paths and keystore see the following tech-note: Configure Connect Directory Services to use LDAPS