Installing and Configuring stunnel with Adobe Connect
This article applies only to that subset of on-premise Adobe Connect installers and administrators who terminate Secure Socket Layer (SSL) directly on Adobe Connect Servers using stunnel.
Note: This article contains images. You may need to refresh the WordPress page in your browser to view them.
The preferred means of SSL termination for on-premise Adobe Connect deployments is to offload it to an appliance; all high-end hardware-based load balancing devises are also SSL accelerators.
In certain circumstances, such as in labs and for small deployments, or possibly for use of static IPs on Adobe Media Server, (AMS) Meeting VIPs on AWS, stunnel can be used directly on the server. This article describes how stunnel can be used with Adobe Connect.
Step One – Planning: Determine what parts of Adobe Connect you will use stunnel to encrypt:
Securing just login and content:
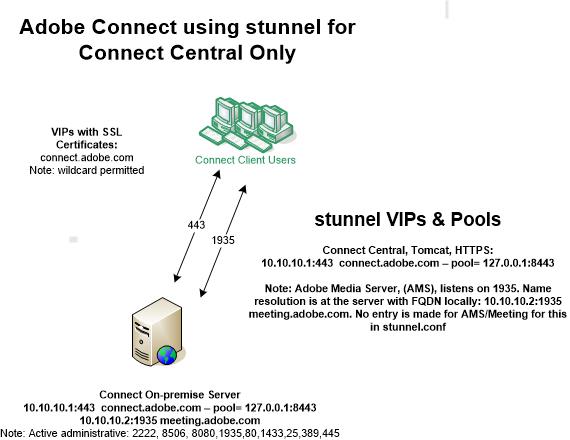
It is possible to simply secure Connect Central, HTTPS for log in and content, but if you do this and leave AMS/Meeting in the clear running RTMP instead of RTMPS, then all Meeting interactions will be unencrypted. Running RTMP instead of RTMPS also precludes the use of the Adobe Connect Transmuxing Server (ACTS) and all Adobe Connect Meeting clients will require the Adobe Connect Meeting application to gain access to Meetings. You will also need to allow network traffic for RTMP on port 1935 throughout the network path. This may be appropriate for a simple Legacy Connect (LCC) lab or a small deployment.
Securing everything:
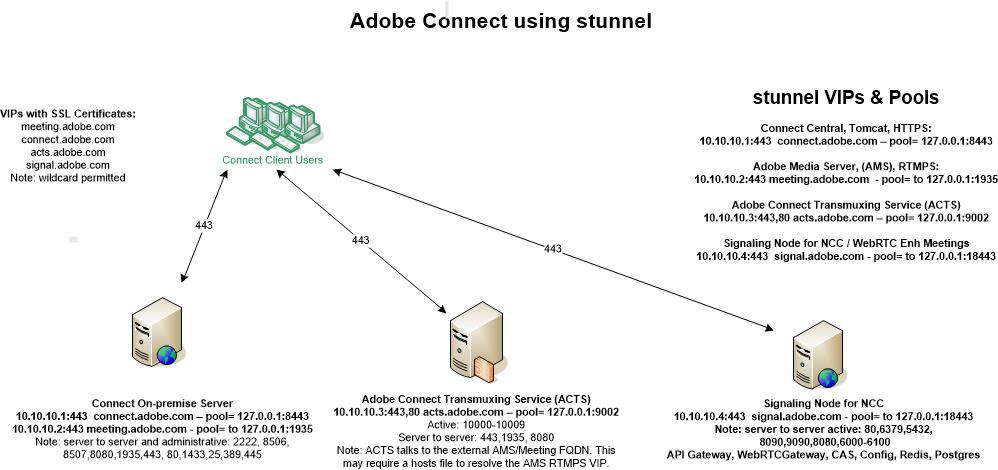
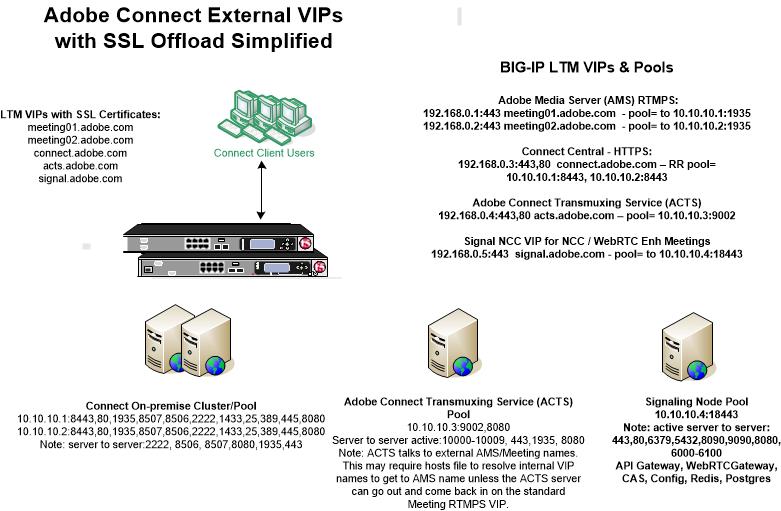
Most customer will want to secure everything, HTTPS, RTMPS and WSS. This will look like the diagram below with stunnel installed on Adobe Connect, ACTS and the New Connect Cluster (NCC) Signal node if appropriate.
Step Two – Create or request FQDNs and SSL certificates:
Begin by making certain you have enough Fully Qualified Domain Names (FQDN) and corresponding SSL certificates support the installation.
Each Adobe Connect LCC server runs both Tomcat and Adobe Media server and requires a separate unique FQDN for each:
Each Adobe Connect Transmuxing Server (ACTS) for browser access needs its own FQDN as well and when SSL is implemented, ACTS must be distributed onto a separate server from Adobe Connect as depicted above.
ACTS also requires uniformity of encryption. If Connect Central and Meeting are running SSL then ACTS must run SSL in order to use browsers for Meetings. For more details on ACTS see the following article: https://blogs.connectusers.com/connectsupport/adobe-connect-server-installations-with-the-adobe-transmuxing-server/
- Configure DNS resolution providing FQDNs for each stunnel VIP for the applications being secured:
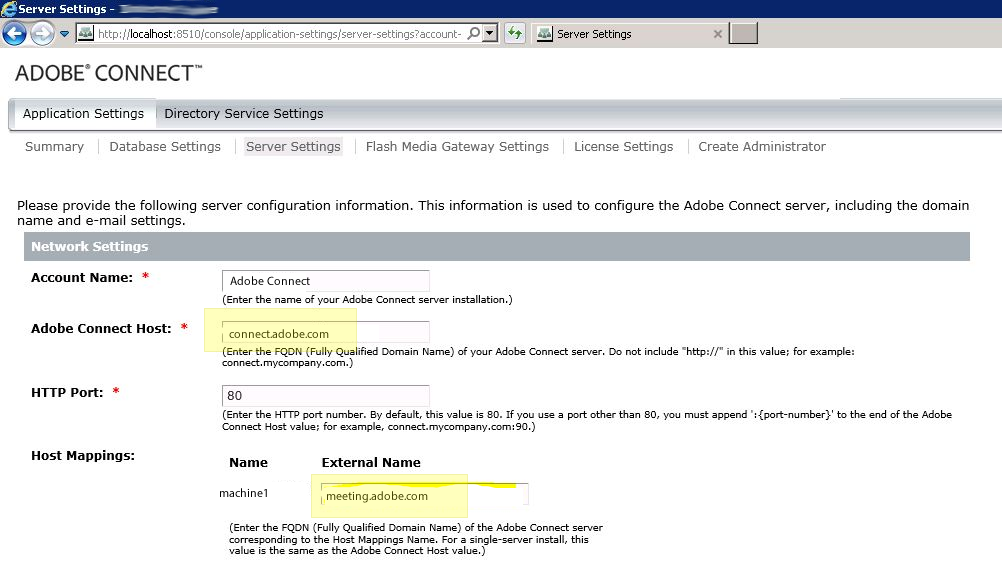
- Connect Central, HTTPS on Tomcat depicted above as connect.adobe.comAdobe
- Meeting on Adobe Media Server, (AMS) RTMPS depicted above as meeting.adobe.com
- For browser access Adobe Connect Transmuxing Server (ACTS), HTTPS, WSS, depicted above as acts.adobe.com
- If configuring the New Connect Cluster (NCC) for WebRTC to run using stunnel, the Signaling Node will also need an external FQDN and stunnel VIP as depicted in the diagram above. The Linux-based Signaling node is depicted above for NCC as signal.adobe.com (although it would be very rare to secure NCC with stunnel. Such an enterprise configuration would more likely be deployed behind a high-end hardware-based laid balancing device with SSL offloaded).
- The SSL certificates must be in pem format and the private key configured without a passphrase.
- The SSL key and certificate must be in separate files.
- A wildcard certificate may be used, otherwise you need a specific certificate for each FQDN and stunnel VIP. The diagram above depicts four FQDNs each requiring its own certificate.
Adobe Connect can be configured with Stunnel to support HTTPS, RTMPS and WSS. Stunnel requires you to provide a private key and a public cert file in .pem format.
Step three – Download stunnel
You may download stunnel from this third-party link: https://www.stunnel.org/
For convenience you may point the stunnel installer to an installation path in the Adobe Connect home directory (although not required) on the Adobe Connect Server.
Unless created by the installer, create a folder called certs and place your certificates and key files in it.
The same applies to ACTS and Signal; the root installation directory is handy although not required.
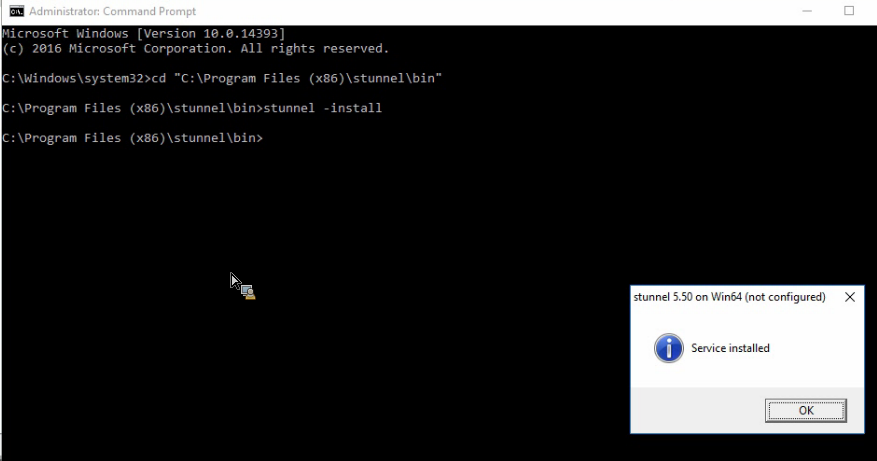
To install the stunnel service: In the command line run: stunnel.exe –install
Step four – Configure stunnel
Below are sample entries for the stunnel.conf files that are appropriate (upon writing this article) for most customers for both Adobe Connect and ACTS servers. However this below list of ciphers and SSL version options is only intended as a sample. The security needs of your enterprise will prescribe the exact settings you use.
The man pages for OpenSSL ciphers and SSL versions are here:
- https://docs.openssl.org/1.0.2/man3/SSL_CTX_set_options/
- https://docs.openssl.org/3.3/man1/openssl-ciphers/#cipher-strings
Edit the stunnel.conf file as noted below. Copy the contents provided here into your stunnel.conf file overwriting the default file placed by the stunnel installer.
Each stunnel.conf file on each server will need to be edited.
This first sample section below will be the header in each stunnel.conf file on each server:
; Protocol version (all, SSLv2, SSLv3, TLSv1)
; we want TLS1, TLS1.1 and TLS1.2 active, so set =all and then say “not SSLv2, SSLv3”
sslVersion = all
options = NO_SSLv2
options = NO_SSLv3
options = DONT_INSERT_EMPTY_FRAGMENTS
options = CIPHER_SERVER_PREFERENCE
renegotiation=no
fips = no
;Some performance tuning:
socket = l:TCP_NODELAY=1
socket = r:TCP_NODELAY=1
TIMEOUTclose=0
This second section has two VIPs to be added to the Adobe Connect Server running Adobe Connect Central, HTTPS and Adobe Connect Meeting, RTMPS:
; application server Connect Central SSL / HTTPS
[https-vip]
accept = 10.10.10.1:443
connect = 127.0.0.1:8443
cert = C:\Connect\stunnel\certs\public_certificate_app-server.pem
key = C:\Connect\stunnel\certs\private_key_app-server.key
;configure ciphers as per your requirement and client support.
;this should work for most:
ciphers = TLSv1+HIGH:!SSLv2:!aNULL:!eNULL:!3DES
; meeting Adobe Media Server SSL / RTMPS
[rtmps-vip]
accept = 10.10.10.2:443
connect = 127.0.0.1:1935
cert = C:\Connect\stunnel\certs\public_certificate_meeting-server.pem
key = C:\Connect\stunnel\certs\private_key_meeting-server.key
;configure ciphers as per your requirement and client support.
;this should work for most:
ciphers = TLSv1+HIGH:!SSLv2:!aNULL:!eNULL:!3DES
This third section will be added to the ACTS server stunnel.conf file:
; ACTS Adobe Transmuxing Server SSL / WSS / HTTPS
[https-vip]
accept = 10.10.10.3:443
connect = 127.0.0.1:9002
cert = C:\Connect\stunnel\certs\public_certificate_acts-server.pem
key = C:\Connect\stunnel\certs\private_key_acts-server.key
;configure ciphers as per your requirement and client support.
;this should work for most:
ciphers = TLSv1+HIGH:!SSLv2:!aNULL:!eNULL:!3DES
This fourth section will be added to the Signaling Node for NCC if approriate:
; NCC Signaling Node Server SSL / TCP / HTTPS
[https-vip]
accept = 10.10.10.4:443
connect = 127.0.0.1:18443
cert = C:\Connect\stunnel\certs\public_certificate_signal-server.pem
key = C:\Connect\stunnel\certs\private_key_signal-server.key
;configure ciphers as per your requirement and client support.
;this should work for most:
ciphers = TLSv1+HIGH:!SSLv2:!aNULL:!eNULL:!3DES
Step five – Configure Adobe Connect for SSL
Add the following entries to the custom.ini file in the Adobe Connect root installation directory for Connect Central, Meeting and ACTS running SSL:
ADMIN_PROTOCOL=https://
SSL_ONLY=yes
RTMP_SEQUENCE=rtmps://external-host:443/?rtmp://localhost:8506/ACTS_PROTOCOL=wss:443
Note: port 8506 referenced in the RTMP sequence above is for internal server-to-server communication.
After adding these entries, save the custom.ini file.
On each Adobe Connect server, enable SSL by uncommenting the following two sections in /appserv/conf/server.xml (simply search for the word “uncomment” in server.xml and you will do well):
<Executor name=”httpsThreadPool”
namePrefix=”https-8443-“
maxThreads=”350″
minSpareThreads=”25″/>
<Connector SSLEnabled=”true” URIEncoding=”utf-8″ acceptCount=”250″ connectionTimeout=”20000″ enableLookups=”false” executor=”httpsThreadPool” port=”8443″ protocol=”HTTP/1.1″ proxyPort=”443″ relaxedQueryChars=”{}|<>"” scheme=”https” secure=”true”/>
Troubleshooting stunnel on Adobe Connect
The most common issues with stunnel deployments with Adobe Connect tend to be in the formatting of the .pem file. To test the pem, simply rename it to .cer and double-click on it to see if it works and to inspect the certificate chain.
See this error attempting to use cer rather than pem:
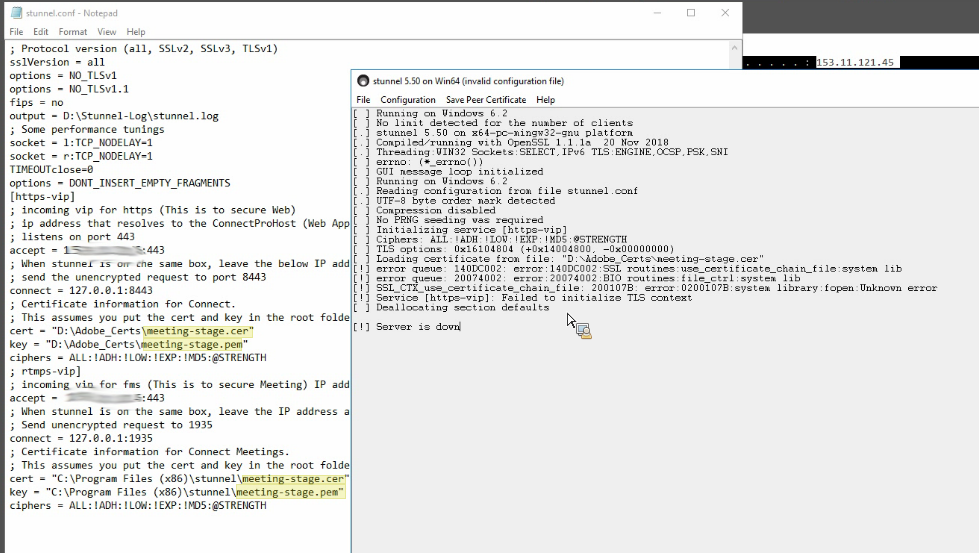
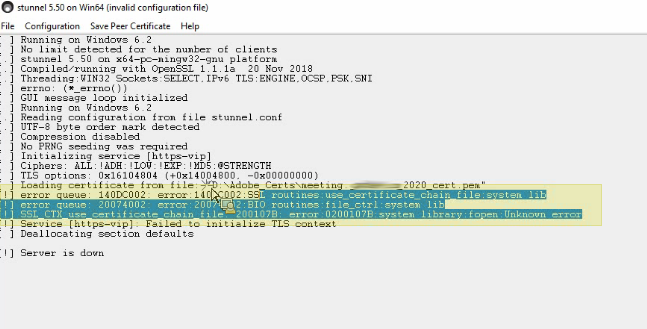
This error below is from lack or a chain or improperly formatted chain. The .pem may have the intermediate and root CA cert in the same file, but they need to be in the right order: Public cert, Intermediate, Root CA
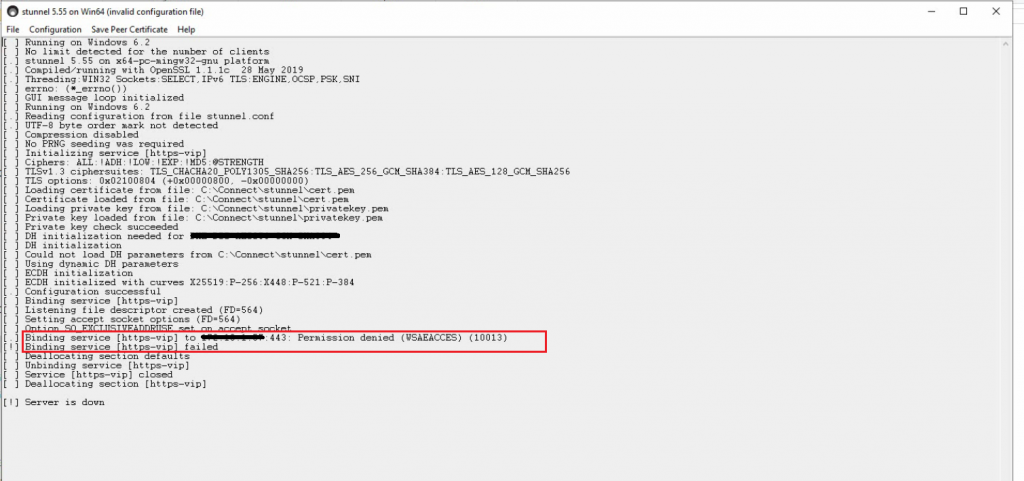
This error below is caused when there is a conflict on port 443: https://blogs.connectusers.com/connectsupport/stunnel-configuration-shows-binding-service-failed/
Here are some additional troubleshooting tips:
Check that the .pem is saved in UTF-8 encoding.
Look for stray characters or carriage returns particularly at the beginning and end of the pem file. It should look similar to this:
—–BEGIN CERTIFICATE—–
gUgePf2CbIMcIkWln8Ujse5WHe42wPFhwVM4Fwdkvy8WD6QoroYzJDzrcu1L15nF…
uigItwLjZ4QluVJehYUc3wVJeYtYXPyXyFAJzrKSJ81I
—–END CERTIFICATE—–
If the path to the certificate used in stunnel.conf does not resolve in stunnel, try a relative path without quotes. Some builds of stunnel will use a relative path.
And if you are setting up a test lab installation wherein you are using hosts files for name resolution make certain the FQDNs are correct including case. BSD-based OS’s are case sensitive, while Windows is not. That one discrepancy has been tripping up administrators since the 90’s.
- Make sure the Adobe Connect server can resolve the machine-name of the ACTS server. A hosts file may be required for this.
- Make sure the ACTS server can resolve the external name of the AMS Meeting server.
- Restart all the Adobe Connect services on the Connect server
- Restart the ACTS service on the ACTS server
When a Connect server is running with untrusted, expired or private SSL certificates, Connect Meeting rooms will not launch. When you click on a Connect Meeting URL, the initial browser that opens spawns a second browser (the Connect Meeting App). It is this hand-off between browsers that requires a fully trusted public certificate to complete; the Meeting will hang upon loading if the certificate is untrusted: During this hand-off between browser sessions, there is not any opportunity to click your way through an untrusted connection. The Meeting will simply hang.
CPU load on the server will increase with the addition of stunnel. It is prudent to check to see how much CPU stunnel is using.
Check your certificates as well; the certificate must be in .pem format. if it is .pfx, then convert the certificate:
If you have a .pfx file with your private key and public certificate, you need to extract the key and cert from the .pfx file and save them to individual .pem files.
Install OpenSSL: OpenSSL
Open a command line window and change to the directory where you installed OpenSSL, i.e. c:\OpenSLL-Win64\bin\.
Run the following command to extract the private key and save it to a new file: openssl pkcs12 -in yourpfxfile.pfx -nocerts -out privatekey.pem -nodes
Now run the following command to also extract the public cert and save it to a new file: openssl pkcs12 -in yourpfxfile.pfx -nokeys -out publiccert.pem -nodes
Use the pem files in your Stunnel config.
Using stunnel as the SSL option with Adobe Connect has limitations over against offloading SSL to high-end load-balancing appliances insofar as stunnel has no means of load-balancing and checking applictaion health across multiple servers in a pool/cluster.
The small cluster example depicted below is very similar to our stunnel example above, but here we show a cluster of two LCC servers. Note how the relationship among the VIPs and pools is very similar to stunnel: Every AMS server has its own VIP and FQDN. Each Connect server instance however shares a single FQDN VIP and the load-balancer does a round-robin activity distributing load between the two servers in the pool. The ACTS and Signal each have their own VIP. Any additional ACTS and Signal server like AMS would have its own FQDN and VIP:
Adobe Connect Support can help if you run into trouble or need further advice.