How & what is needed to create New Events?
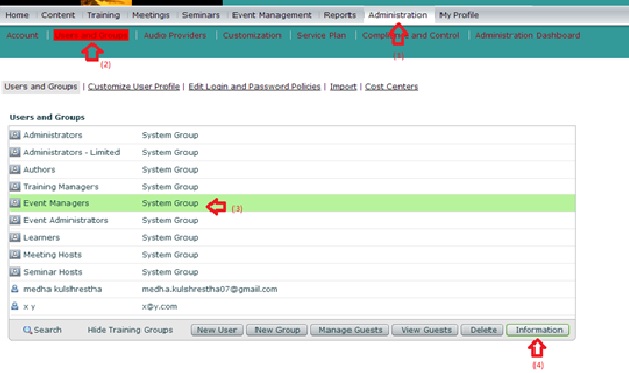
To create an event in Adobe Connect, user should be the part of the Event Manager. Follow the below steps to be the part of Event Manager:
1) Go to Administrator
2) Click on Users and Group
3) Select Event Managers
4) Click on Information
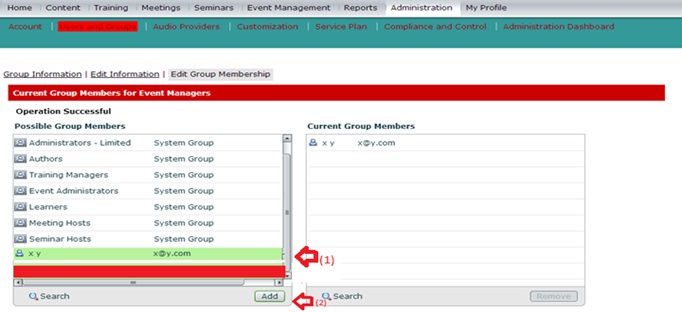
1) Click on Edit Group Membership
2) Click on Add
3) Your name would be displayed in Current Group Members list
1) Go to Event Management
2) My Events
3) New Events
Now let’s follow through the settings to create an event.
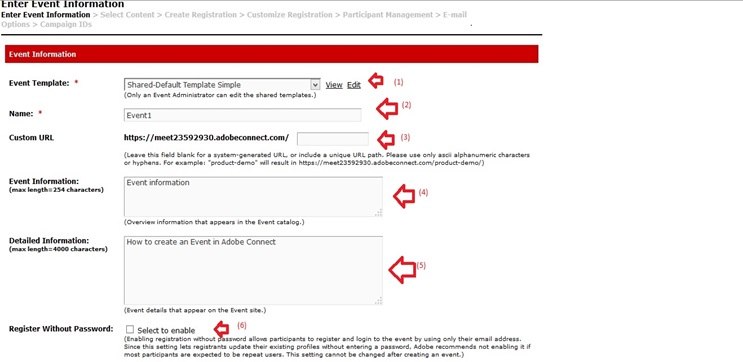
1) Choose the Event Template: We can either choose a default template or we can create our custom template which has all our images and logo in it.
2) Name: Give any unique name to this event
3) We can provide any custom URL to the event
4) Event Information: It is a brief information of event which reflects in Event Catalog.
5) Detailed Information: This information appears in Event site and email.
6) Register Without Password: If this option is checked, participants don’t need to put the password while registering themselves for that event
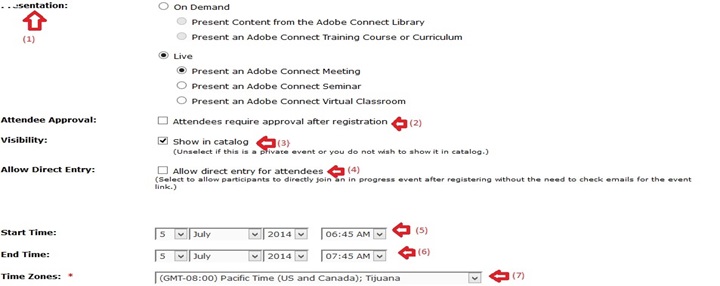
1) We can select any On Demand course such as Course, Curriculum, Contents or any Live Sessions like Meetings or Seminar to wrap with this Event. Here we are taking the example of a Meeting or Live Session. To wrap a meeting with this event, user should be the part of meeting host.
2) If Attendee require approval is checked, Event Manager gets the email to approve the participant after participant register for the event.
3) If Visibility is checked, that event will be visible in Event Catalog
4) If Allow Direct Entry is checked, participants can join the event right after registering, they don’t need to wait for an email to enter in the Event
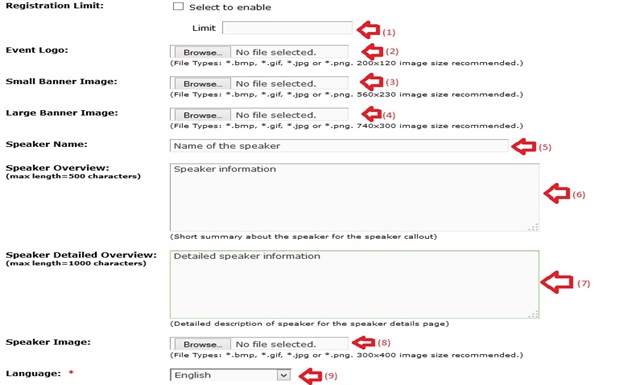
1) We can set the registration limit in our Event that how many participants can register for this particular event
a) We can upload Event Logo, Small Banner, Large Banner, and Speaker Image.
b) We can write the name of the speaker, introduction of the speaker and can choose the preferable image.
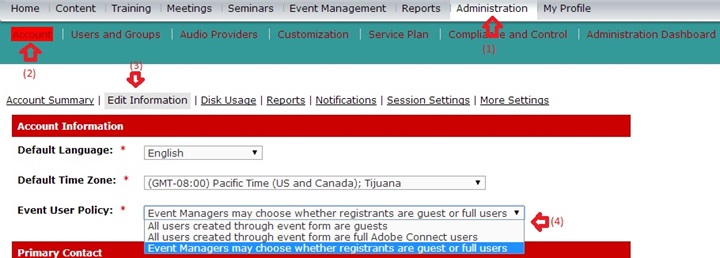
1) Event User Policy: By using this feature we can decide that the users created through that event should be just guest or should be full Adobe Connect user.
2) With the help of tags, we can segregate different kind of events in our Event Catalog.
Click on Next.
In case you get Event User Policy option Disabled, please follow the below steps:
1) Go to Administration
2) Account
3) Edit Information
4) Choose Event User Policy from the drop down menu
On the next page, as we selected the meeting to wrap with this Event, we will have our meeting available in our account
Select the one which you want to use.
Click on Next
Create Registration: By default top 5 questions to be asked in the registration form are checked, if we want to add more field, we can do that as well.
Click on Next
We can customize our registration question by using this field.
We can add our own question which can be
a) Multiple choice
b) Short Answer type
c) Yes or No type
Click on Next
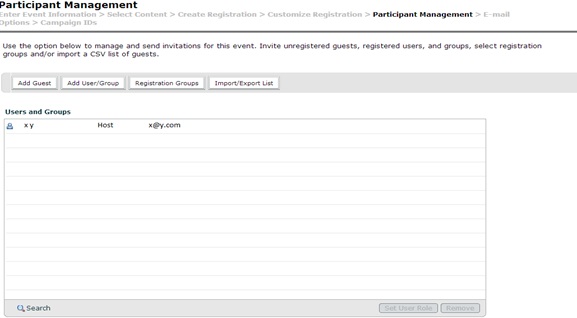
We get the option to add invitees for that Event
a) Click on Add Guest to add the guest individually
b) Click on Add User/Group to add any existing user or group in the event
c) Click on Registration Groups if you want to move all the participant automatically in a group existing in your account
d) With the help of Import/Export List we can add number of participants using .csv file format
Click on Next
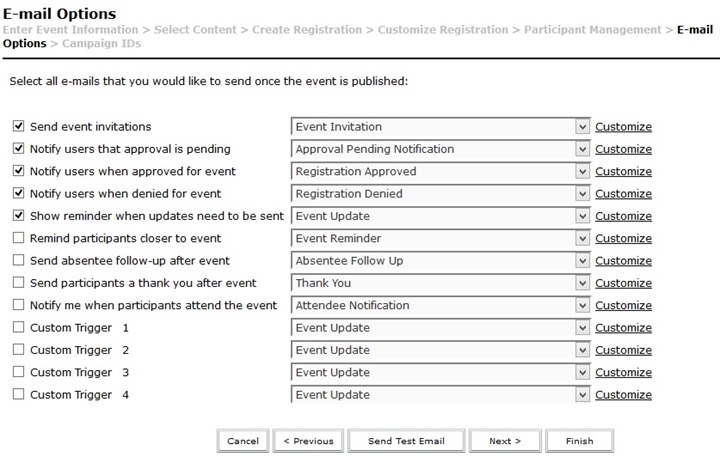
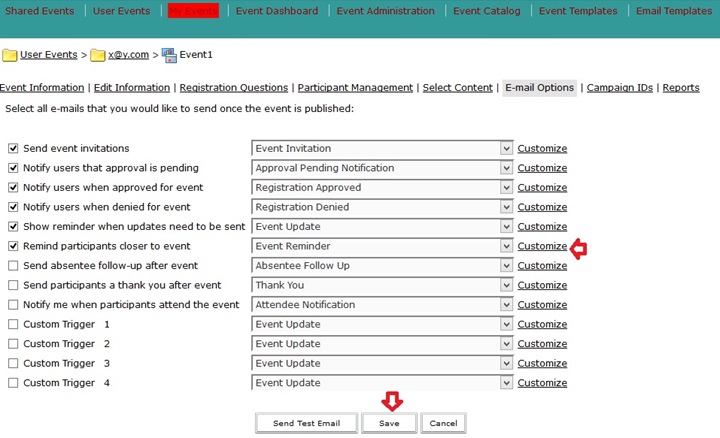
With the help of E-mail Options, host can decide that what all email participants should receive. Host can create own email as well by using Custom Trigger.
Click on Next
It is for enabling Campaign Tracking id so that host could know that which link or media the participants are using to register for the event.
Tracking id is created by the Event Administrator
Click on Finish
After clicking on Finish button, we have to come on Event Information page and click on Publish button at the bottom of the page.
After publishing the Event, if we make any kind of change in the event, we have to republish that field. For example if we add an email option in the publish event from the E-Mail Option we have to republish it
Adding Reminder participants closer to event and then hit Save
On the Event Information page, we get the status
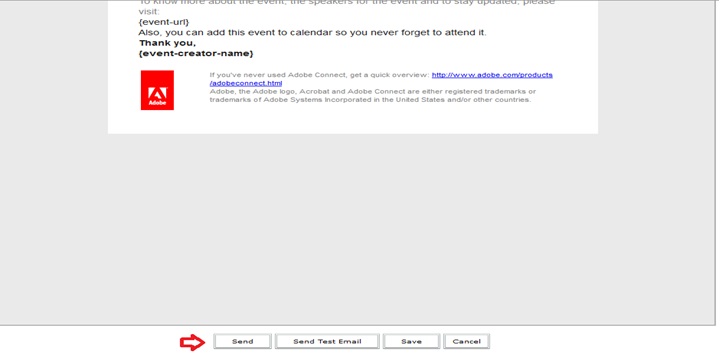
Click on Edit/Send Notifications
a) It navigates to Edit-Email page.
b) Scroll down till the end of the page
c) Click on Send button
