SSL Configuration Checklist for Connect with AEM-based Events
This supplemental checklist alongside the Adobe Connect installation guide and the SSL Configuration guide, will help expedite your SSL implementation of Connect with AEM-Events:
1. Always begin with a fully functional installation of Connect and AEM-based Events before adding SSL; Do not attempt to secure a server that is not fully tested to run all features without SSL: A server running all features in the clear with no problems manifested is the only place to begin.
2. Decide whether to use hardware-based or software-based SSL and obtain appropriate public certificates and FQDN’s. If needed, see Mohit’s excellent instructions to generate CSRs. If you are using software-based SSL, stunnel can either be installed locally or on a separate server. If you are using hardware-based SSL you will want to refer to the relevant third-party documentation along with that provided by Adobe. For F5 BIG-IP LTM, the following articles along with this blog article and the resources aforementioned will help:
- The Adobe Connect Deployment Guide on the F5 Website needs Updating
- Adobe® Connect™ server pools/clusters and hardware-based load-balancing devices with SSL acceleration
For information about stunnel installation options with Connect 9, see Jim’s blog post on Adobe Connect 9.0.0.1 and 9.1 stunnel installation options. Within the 9.0.0.1 installation folder, under \Adobe Connect 9.0.0.1\Adobe Connect\Merge_Modules, we provide the installer for stunnel-4.53. From there, you can install Stunnel 4.53 for your SSL deployment. Adobe QE has tested stunnel version 4.56 collocated with Connect – installed within the Connect installation directory. These days it is arguably prudent to use the latest security option tested. Depending on the version of Connect you are running, if you wish to use stunnel locally, then you would create and/or populate the stunnel directory under the root install directory: Connect\9.1.2\stunnel.
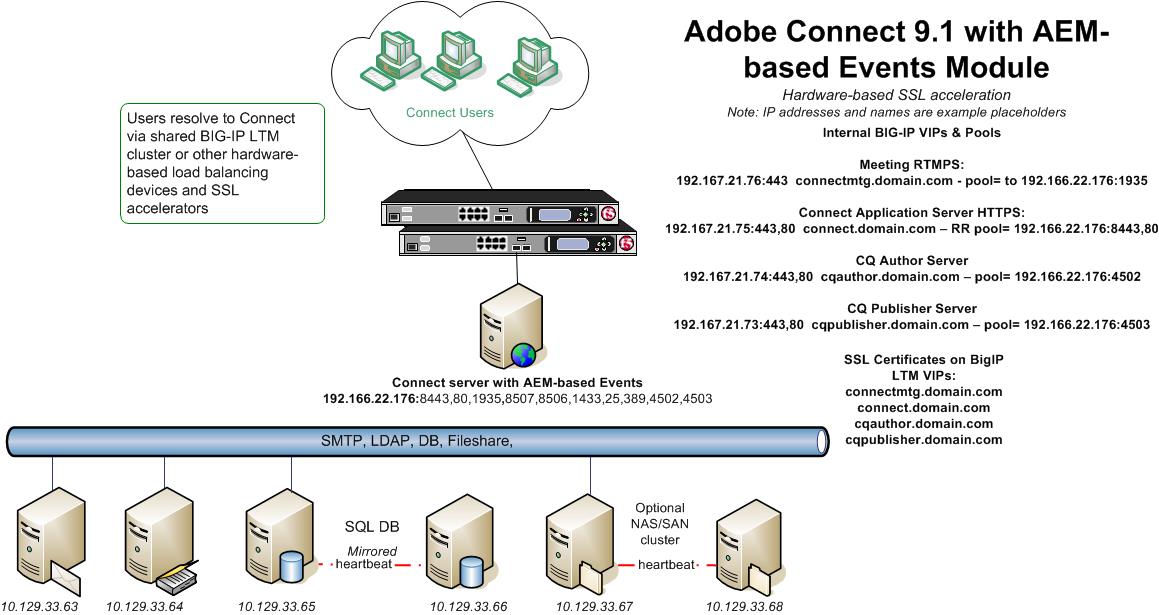
Click on this thumbnail diagram below to see what it would look like with a hardware-based SSL accelerator:
Click on this thumbnail diagram below to see what it would look like with stunnel collocated with Connect:
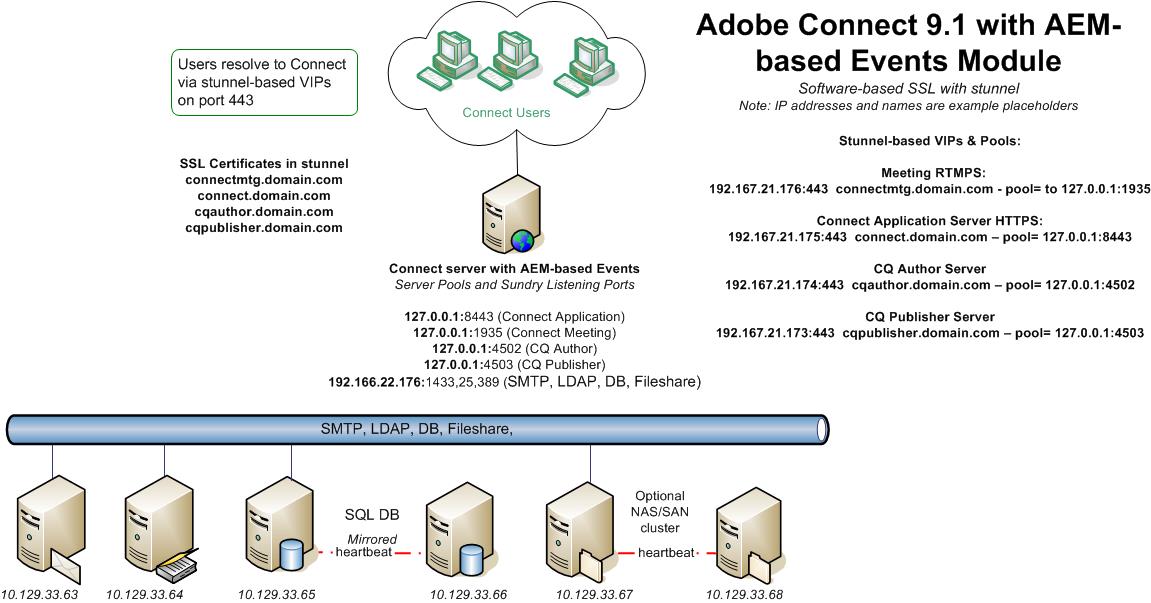
The rest of this checklist & summary will assume stunnel is being used collocated with Connect, but the configuration variables will apply to hardware-based external SSL acceleration options as well and even a casual glance back at these diagrams will help you infer the differences.
The sample file editing offered herein will be based on the single server stunnel example depicted in the diagram above.
3. Four FQDN’s are required: This is how our working example FQDN list would appear in a host file.
- 192.167.21.176 connectmtg.domain.com
- 192.167.21.175 connect.domain.com
- 192.167.21.174 cqauthor.domain.com
- 192.167.21.173 cqpublisher.domain.com
4. Four certificates (or a wildcard certificate) is needed; here is the list of certificates for SSL following our example:
- connectmtg.domain.com
- connect.domain.com
- cqauthor.domain.com
- cqpublisher.domain.com
Note: These are depicted in our working example as a wildcard certificate: domain.com. If the certificates are not trusted public certificates, then meeting rooms will not open; self-signed certificates will not work with meeting unless they are installed on all clients. Place the certificates into the stunnel installation directory: \Connect\9.1.2\stunnel\
5. Backup and edit the stunnel.conf file: in the \Connect\9.1.2\stunnel\ directory to set up the four VIPs and pools:
stunnel.conf for four servers on one
; Protocol version (all, SSLv2, SSLv3, TLSv1)
sslVersion = all
; Some performance tunings
socket = l:TCP_NODELAY=1
socket = r:TCP_NODELAY=1
TIMEOUTclose=0
options = DONT_INSERT_EMPTY_FRAGMENTS
; Service-level configuration
[https-vip]
; incoming vip for https (to secure Connect Application Traffic)
; ip address of the server with stunnel on it
; listens on port 443
accept =192.167.21.175:443
; ip of the connect server
; send the unecrypted request to port 8443
connect =127.0.0.1:8443
; Certificate info for Connect cert key in stunnel root
cert = domain.com.cert.pem
key = domain.com.key.pem
[rtmps-vip]
; incoming vip for fms (to secure Connect Meeting Traffic)
accept = 192.167.21.176:443
; ip of the fms server
; Send unencrypted request to 1935
connect = 127.0.0.1:1935
; Certificate info for Connect meeting cert key in stunnel root
cert = domain.com.cert.pem
key = domain.com.key.pem
[CQ_Author-vip]
; incoming vip for CQ-Author (to secure AEM-based Events Authoring)
accept = 192.167.21.174:443
; ip of the CQ Author server
; Send unencrypted request to 4502
connect = 127.0.0.1:4502
; Certificate info for CQ Author cert key in stunnel root
cert = domain.com.cert.pem
key = domain.com.key.pem
[CQ_Publisher-vip]
; incoming vip for CQ-Publisher (to secure AEM-based Events Publishing)
accept = 192.167.21.173:443
; ip of the CQ Publisher server
; Send unencrypted request to 4503
connect = 127.0.0.1:4503
; Certificate info for CQ Publisher cert key in stunnel root
cert = domain.com.cert.pem
key = domain.com.key.pem
6. Next backup and edit the custom.ini file: By default, the custom.ini will point to 4502 and 4502 for CQ Author and Publisher respectively; you must change the links to reflect https rather than http and also change the names to the correct FQDNs and also enable SSL for Connect with these following entries:
CQ_AUTHOR_SERVER=https://author.adobeconnect.com
CQ_PUBLISH_SERVER=https://publisher.adobeconnect.com
DOMAIN_COOKIE=adobeconnect.com
ADMIN_PROTOCOL=https://
SSL_ONLY=yes
RTMP_SEQUENCE=rtmps://external-host:443/?rtmp://localhost:8506/
7. Next backup and edit the server.xml file; in the \appserv\conf\ directory; uncomment two sections depicted here to enable SSL:
<Executor name=”httpsThreadPool”
namePrefix=”https-8443-”
maxThreads=”350″
minSpareThreads=”25″/>
<Connector port=”8443″ protocol=”HTTP/1.1″
executor=”httpsThreadPool”
enableLookups=”false”
acceptCount=”250″
connectionTimeout=”20000″
SSLEnabled=”false”
scheme=”https”
secure=”true”
proxyPort=”443″
URIEncoding=”utf-8″/>
Note: Be sure to test the server.xml file for correct editing by opening it in a browser and viewing any syntax errors.
8. After configuring the stunnel.conf, the custom.ini and the server.xml file for all four server instances, stop all five the services in the following order:
- Adobe Connect CQ Author
- Adobe Connect CQ Publisher
- Adobe Connect Server
- Adobe Flash Media Server
- stunnel
9. After all services are completely stopped, start all five services in reverse order; do not cheat and just restart each one successively.
- stunnel
- Adobe Flash Media Server
- Adobe Connect Server
- Adobe Connect CQ Publisher
- Adobe Connect CQ Author
10. Open a browser on the Connect server; go to localhost:4502 and log into CQ5 Author as an administrator and edit the URL
- Select CRXDE Lite on the menu list on the right side of the screen
- Go to: content>connect>c1>jcr:content
- Scroll to the serverURL line
- Edit the URL for https
- https://connect.domain.com
11. Open a browser on the Connect server and go to localhost:4503 and log into CQ5 Publisher as an administrator and edit the URL
- Select CRXDE Lite on the right menu list
- Go to content>connect>c1>jcr content
- Scroll to the serverURL line
- Edit the URL for https
- https://connect.domain.com
12. Open a browser on the Connect server and go to localhost:4502/system/console/configmgr and log in as an administrator and edit the author externalizer name and statistics URL
- Scroll to and edit the Day CQ Link Externalizer and edit the hostname value to reflect the FQDN of the Author server
- cqauthor.domain.com
- Scroll to and edit the Day CQ WCM Page Statistics and edit the localhost:4502 URL to reflect the FQDN of the Author server and HTTPS
- https://cqauthor.domain.com/libs/wcm/stats/tracker
13. Open a browser on the Connect server and go to localhost:4503/system/console/configmgr and log in as an administrator and edit the publisher externalizer name and statistics URL
- Scroll to and edit the Day CQ Link Externalizer and edit the hostname value to reflect the FQDN of the Publisher server
- cqpublisher.domain.com
- Scroll to and edit the Day CQ WCM Page Statistics and edit the localhost:4503 URL to reflect the FQDN of the Author server and HTTPS
- https://cqpublisher.domain.com/libs/wcm/stats/tracker
14. Stop all services and and restart as shown in steps 8 & 9 or reboot the server
15. Log into Connect and test all features including the Events module.
Troubleshooting appendix:
- Check to make sure all five services are running and start any that are not running.
- Once all the services are up, click on the stunnel.exe icon in the stunnel directory and insure that stunnel runs without errors
- If stunnel.exe throws an error then examine the stunnel.conf for syntax problems
- If stunnel.exe starts successfully then look elsewhere for problems
- If Firefox browsers Fail to Connect when stunnel is used to secure Adobe Connect, then double check to be sure that the
- sslVersion = all
- fips = no
- To make certain the help files are served via SSL, follow the instructions in Jim’s blog article: Changing the Help Links to use HTTPS://
- Make sure there is not a passphrase on stunnel: see Jim’s blog article Adobe Connect Stunnel prompting for passphrase when server/services restarts
- If stunnel does not start with Connect upon reboot, this technique will help: Stunnel does not Startup with Connect
- Depending on the version of Connect you are running, you may need to add the certificate to the java CA certificates in Connect in order to allow images in the AEM-based Events module to appear in Connect. Ignore this step unless you are running Connect 9.0.0.1 and even then, if at all possible, simply use a later version of Connect instead as this issue has been fixed and this workaround is made superfluous for later versions:
- For 9.0.0.1, export and then import the SSL certificate: Log into Connect and click on the lock in the URL line to the left of HTTPS and click the button in the pop-up: More Information>View Certificates>Details>Export to export the SSL certificate. Save the certificate in the jre\bin directory in the root install directory for Connect: Connect\9.0.0.1\jre\bin
- Use the command prompt to complete the importation: F:\Connect\9.0.0.1\jre\bin> keytool -import -trustcacerts -alias connect -file certificate-name -keystore cacerts
- The default password is changeit.
- Overwrite any existing certificate.
- The italicized alias connect is a variable
- The italicized certificate-name must match the name of the certificate
- When importing the cert to cacerts, you need to specify the path to the correct cacerts location.
- Otherwise you just end up with the cacerts file in the same location from which you launched the keytool
- In Connect <install-drive>:\Connect\9.0.0.1\jre\lib\security\cacerts
- Note: –import command works, but isn’t listed under keytool –help; it should be –importcert
On Windows you can still use native SpeedGrade support for NVIDIA Quadro graphics cards to provide external monitoring